Monday, August 17, 2015

Mindful {Monday} | Fear


Fear is meant to stop you from doing things that are potentially dangerous, foolish, or embarrassing. In many ways, fear keeps us safe, but letting fear drive all our decisions doesn't allow us to live our lives to the fullest potential.

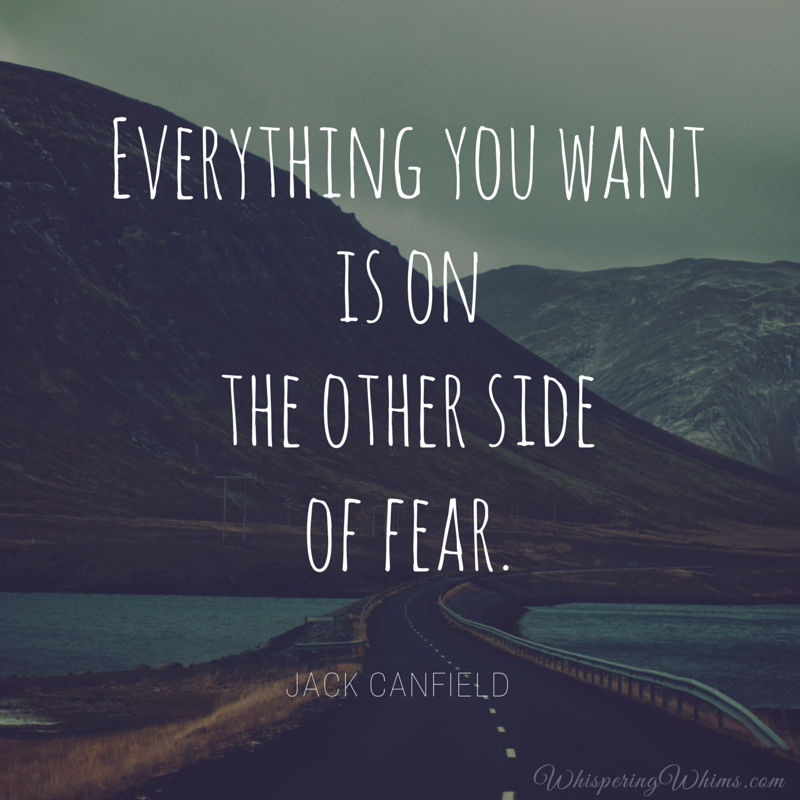
Fears are meant to be conquered.  Each fear that is conquered is a building block in the foundation and structure of our lives.  These achievements build us into confident, happy, and wiser people. 

Sometimes I need to remind myself of this.  I try to push myself to the other side of risk and fear, because I don't want to look back and say "what if." Some risks are worth taking.  If nothing else, you'll always learn something. 

To clarify, I am one of the least impetuous people you'll ever meet.  I analyze and mull over even the tiniest of decisions, but I try to set myself a time limit to prevent overthinking.  Once I've reached a decision, any risk I take tends to be mostly calculated.  

Six years ago, I took one of the BIGGEST risks of my life.  I turned down a dream job, left home, moved 800 miles {without a job - but that's another story},  and took a chance on love.  haha  

Cliché, I know. I'm a romantic through and through.   

It ended up being the right choice for me.  The risk panned out.  I had a job within a couple weeks and in 6 months was well on my way to being completely integrated in my new Southern environment. Flash forward to now, I'm still a work in progress {obviously}, but I'm happily married to Mr.Risk and busily building our cozy home with him.  

Even though this risk worked out, I still find myself blazing ahead at times only to then pause and teeter on the precipice of a decision.  

Fear is, and probably always will be, something I need to work to overcome.  

Knowledge is half the battle though, right?  Knowing that fear can be limiting, and being able to remind myself of this fact, is what keeps me reaching higher, digging deeper, and trying my best to choose a positive and fun path to travel!  Even if, at first, the path looks a little unfamiliar and scary. 

By the way, shout out to a few people I know that are taking risks and braving new paths. 

  • I have a friend that took an amazing solo backpacking trip to Italy!  This was a big courageous move for her and I'm so proud.  Talk about stepping out of your comfort zone and conquering fears.  She's amazing and I can't wait to hear all about her spectacular journey. 
  • A friend of a friend, who is a wonderful person and a great inspiration to me.  She just accepted a new job offer and I'm so happy for her! It's going to be new, a bit scary, and hopefully just what she needs to help her spread her wings and grow even more wonderful than before. 
  • Also, that Mister Risk of mine?  He's going back to University next week to get his Master's. Words cannot express how excited I am for him.  I know how much thought and time he put into making this decision and I am so entirely proud of him for going after what he wants! :)

Tuesday, August 11, 2015

DIY Planter Boxes with Pallet Wood

Back in the Spring, we picked up a couple 14.9" square plastic garden planters from Home Depot. While they were a good deal and looked nice, they were lacking height and just didn’t have the look we wanted on our front porch..  
14.9 in. Warm Copper Leonardo Square Plastic Planter

Since we've been hoarding some dismantled pallet wood since last Fall, I figured it was time to put it to good use and a planter box project seemed like the perfect way to get rid of some of our stockpile.

I had a good idea of what I wanted and I found the plans for the project on Ana White's site:
Planter Box Plans.
I didn't add up the cost of these boxes, because we had most of the wood and only needed a few pieces, but I'd say they were definitely less than $10 a box. 


DIY Ana White Planter Boxes | Whispering Whims


1. Cut all your wood to size and lay out your sides.  We altered our dimensions to fit our HD planters so they would slip in for a snug fit.  We laid out all the sides to take measurements and make sure everything would be square once assembled.
2. Glue, clamp, and nail the cross pieces to the pallet wood side planks.
3. Drill pocket holes.
4 & 5 Insert your pocket hole screws and attach the legs to your sides.

We made the legs flush with the top of our sides and made a simple frame for the top.  This allowed the lip of our HD planters to sit firmly on top.  *Not visible: there is a shelf inside these planter boxes to hold the bottom of our HD planters.

Once assembled, grab a lovely assistant, paint, and brushes and finish your project! :)
{Watson did get a bit of white paint on him, haha}  


Something I didn't do, but wish I did: fill in the cracks with wood filler.  There were a couple places that really could have used it, but I was in a rush and decided to skip it.  They turned out great, but could have been even better had I taken an extra 30 minutes.   On an off weekend, we are going to use wood filler in the seams, sand them down, and do a second coat of white paint. 

Monday, August 10, 2015

Vegan Chocolate {Chocolate Chip} Banana Bread


A few weeks ago I was having a pretty mean chocolate craving and I wanted something baked.  I also happened to have a bunch of very ripe bananas and some cocoa we picked up while in Mexico earlier this year... This all led me to a delicious experiment.

I've been tweaking this recipe over the last month, trying to figure out the best way to keep it moist and yummy, without all the fat and cholesterol that come with adding eggs and butter.

In truth, it's really difficult to mess this up.  I've made it 3 or 4 times now and made little changes each time with good results.  This most recent time I decided to add the Almond Butter IN the recipe, but it can easily be left out and added AFTER the recipe on a slice to enjoy.  Peanut butter also works too for a good Choco-Peanut-Butter combo. YUM!

Ingredients:


  • 1 1/2 Cup Whole Wheat Flour
  • 1 1/2 Cup Ripe Bananas    {Around 3 Bananas}
  • 1 Cup Raw Sugar
  • 1/2 Cup Cashew Meal     {Check the tips for more info}
  • 1/3 Cup Applesauce
  • 1/3 Cup Cocoa Powder
  • 1/4 Cup Almond Butter*
  • 1/2 Cup Vegan Chocolate Chips     {Enjoy Life Semi-Sweet Mini Chocolate Chips}
  • 2 Tbsp Egg Replacer*      {Bob's Red Mill Vegetarian Egg Replacer}
  • 1/3 Cup Apple Juice*
  • 1 Tsp Vanilla Extract
  • 1/2 Tsp Salt
  • 3/4 Tsp Baking Soda

Directions:

Combine bananas, sugar, cashew meal, applesauce, almond butter, vegan eggs, and vanilla in mixer until even consistency.

Stir in dry ingredients mix until evenly combined.  I usually combine these ahead of time in a separate bowl and then slowly mix into the wet ingredients. 

Add chocolate chips last.

Then pour into a 9" Bread Pan lined with Parchment Paper. 

Bake at 350°F for 1 hour, or until toothpick inserted in center comes out clean.

Tips:

For Vegan Eggs: 

2 Tbsp of Flax Meal mixed with 1/3 cup Apple Juice (water can be used instead)

OR

2 Tbsp Egg Replacer mixed with 1/3 cup Apple Juice or Water

To make Cashew Meal from scratch: Grind up a little less than 1/2 cup raw cashews. 
* For nut free alternative, just increase the Whole Wheat flour to 2 cups and omit the Almond butter by increasing applesauce to 1/2 cup.


Vegan Chocolate {Chocolate Chip} Banana Bread Calories


Based on the recipe serving 18 {roughly 1/2" slices}, there are 151 calories in each serving.

If you substitute the almond butter with applesauce you will reduce the fat and calorie content further.


I have not experimented with reducing the sugar, because I was looking for a sweet recipe, but if you come up with a good sugar swap let me know! :)


Wednesday, August 5, 2015

5 Dreamy & Romantic Places to Relax & Play

Jackson Hole, Wyoming - Fireside Resort Glamping
This resort brings our DIY glamping experience to a whole other level.


Velassaru Maldives - Velassaru Resort

Soak up the sun as a beach bum or go explore under the sea.  Either way this resort in the Maldives looks like a complete escape.


Rothenburg ob der Tauber, Germany - Hotel Gotisches Haus

Honestly, every place we visited in Bavaria was magical.  Christmas in Europe is extremely cozy and makes you want to snuggle.  This hotel and sweet little town was like being in a fairytale.


Kakslauttanen, Finland - Kakslauttanen Glass Igloos
Speaking of cozy places to snuggle... this place is a must if gazing at the Aurora is on your bucket list.


Oia Santorini, Greece -Andronis Luxury Suites
This beautiful place to stay has some gorgeous views.


Monday, August 3, 2015

Mindful {Monday} | Time


Both this week and last, I've been thinking quite a bit about time.  Not necessarily how little of it I seem to have, about the past, or about the future, but about how I experience it.  It amazes me how time can seem to drag one week and then simply fly by the next.  Time is behaving the same, but it is how time is experienced that is different.

The best days are the ones that seem like they've been fully experienced.  The days where time seemed to move the exact speed that you expected.  The days where you were able to fit in everything that you wanted and you enjoyed your time fully.  

For me, I find that these days happen when I don't overwhelm myself with tasks, errands, or try to cram too much in.  Right now, it can seem difficult to not feel overwhelmed by a lack of time.  I try to remind myself to take it easy.  The biggest thing I need to remember is to realistically plan out my days and not over commit.  I often feel terrible saying "no" to events, favors, and last minute plans, BUT I've learned that the stress I feel is much worse when I say "yes".

Another thing I've learned is that saying "no" to my own ideas or ambitions is sometimes also necessary.  That's where the "being realistic" comes in.  There are only 24 hours in a day and most of them are already occupied with pre-existing commitments... you know, like sleep.   If I am too ambitious with my planning,  something has to give; when it's sleep that gives, I get terribly miserable.  {I'm already operating on a deficit most of the time... take away a couple more hours... well let's just say no one wants to see that.}

I'm making it a goal to experience more enjoyable and "full" days. That doesn't mean dropping all my DIY goals, projects, and adventure ambitions...or quitting my job, doing yoga, and eating pizza all day {bye college}.  It means that I schedule in "buffers" for my down time.  It means I consciously choose to make time to enjoy my day.  Ten minutes of a hot cup of tea in silence,  five minutes of reflection before bed,  three mindless minutes of facebook or instagram when I wake up in the morning... these are just small examples of "breaks" to breathe.  I'd love to take longer breaks, but sometimes I find it less overwhelming and more sustainable to start small and scale up.

Notice, reflect, and adjust. :)  JUST keep it simple.

I love it when my tea tag speaks to me. 


All images and text are property of Rose Spadaro and may not be reproduced without permission. This site is powered by Blogger and was made a little lovelier by The Sunday Studio.