Thursday, October 22, 2015

Autumn Hibernation Time

Ahhh it's that time of the year again. 

It's officially reached the South.  

It's cooled down.  
The humidity is gone {thank goodness}. 
Our grass is finally recovering from the terrible drought. 
The leaves are changing color.  
The skies are brilliant blue.
It's the season of Pumpkin everything, wonderful boots, and coziness.

It's also that time of the year where the mornings are so darn dark and cold 
that I cannot bear to get out of bed and into the shower.  

I love that in the South, summer seems to last for 6 months of the year 
and spring and autumn last for a couple months as well; 
winter is the shortest season.
It was one of the BEST discoveries I made the first year living down here. 

The simple fact that we get adequate warm months, 
makes it easier to survive the change of seasons.

With that in mind,  I still find it funny how I turn into a complete bear this time of year. 
Walks at 5:00am with the dogs are not so bearable. 
It's totally dark and cold,
and getting dressed takes more effort and more layers. 

Pippa, our eldest fur baby, is just like me.
Alarm goes off and she is straight under the covers. 
Adamantly denying that it is time to wake up.
The struggle is real. 

I remember in kindergarten we were instructed to all bring in a little stuffed bear,
and in an effort to teach us about animals that hibernate
our stuffed animals had to stay in our little cubbies until spring.  
{Except during nap time.. then our bears could come out and cuddle.}


This will be my little cuddle bears and me until next year...


On a bright note... I heard it snowed in New York last weekend.  haha :) 

Wednesday, October 21, 2015

Wander {Wednesday} | Queenstown, NZ

Queenstown was supposed to be a drive by on our way to Wanaka.  As we drove higher into the mountains and then into the city, the temperatures kept steadily dropping.  I'm not sure we were originally even planning on getting out of the car, but on our drive the views just kept getting more breathtaking. The clouds were slowly clearing and when we finally reached the city of Queenstown, there were only traces of clouds in the brilliant blue sky.  The city felt entirely cozy during this golden hour, with the dark expansive lake, rimmed with pine trees, and nestled between the sun-kissed mountains. We enjoyed every ray until the sun finally set, then we gorged on Indian food.  Perfect way to end the evening.

Queenstown, NZ | Whispering Whims


Queenstown, NZ | Whispering Whims

Queenstown, NZ | Whispering Whims

Queenstown, NZ | Whispering Whims

Queenstown, NZ | Whispering Whims

Queenstown, NZ | Whispering Whims

Queenstown, NZ | Whispering Whims

Queenstown, NZ | Whispering Whims


Queenstown, NZ | Whispering Whims

Queenstown, NZ | Whispering Whims

Queenstown, NZ | Whispering Whims

Queenstown, NZ | Whispering Whims

Queenstown, NZ | Whispering Whims

Queenstown, NZ | Whispering Whims

Queenstown, NZ | Whispering Whims

Queenstown, NZ | Whispering Whims

Queenstown, NZ | Whispering Whims

Queenstown, NZ | Whispering Whims

Queenstown, NZ | Whispering Whims

Queenstown, NZ | Whispering Whims

Queenstown, NZ | Whispering Whims

Queenstown, NZ | Whispering Whims

Queenstown, NZ | Whispering Whims

Queenstown, NZ | Whispering Whims

Queenstown, NZ | Whispering Whims

Tuesday, October 20, 2015

DIY Wine Cabinet

You know what is the best feeling?

When you come home from a trip to find that your husband finished one of your projects for you...❤!!!

Yes, my husband is a keeper.  

Last Monday, I came back from a trip to NY to visit family, and I did a double take when I walked into the kitchen.  The wine cabinet project that I had left 75% of the way completed, was finished!!!
 {Happy Dance!}

DIY Wine Cabinet - Above the Fridge | Whispering Whims


Since we moved into our home 2 years ago, I have been planning this project, and in August finally decided to just go ahead and have at it.

On one of my Friday's off, I woke up and found where we keep our handsaws, then proceeded to climb on top of our refrigerator and remove the cross piece of the cabinet. :)  All the while, the Mister is laughing and trying to get ready to leave for work.  Just a normal scene from our daily lives.  Haha!

Anyway, that weekend we got everything prepped, primed, cut, sanded, and fitted.  It sat like this for another week, until I was able to caulk the seams... but then I noticed that the front pieces of wood were overhanging the cabinet ever so slightly, which meant we needed to do quite a bit more sanding... have you ever gotten to this part of a project where you are SO close to being finished, only to then require another few hours of effort to seal the deal?  Well, occasionally, when this happens, especially on a Sunday, I just need a break. 

So the project sat, and sat, and well... lucky for me it *magically* got finished while I was out of the house.  AND, there was not a speck of sanding dust to be found.  Only a beautifully finished wine cabinet that looks like it could use a few {several} more bottles! 

Aside from the minor issue with the fit, this project was pretty simple. 

Materials:
5/8" Plywood
1"x 2" boards (we had some extra from another shelf project)
Caulk
Primer
Paint


Tools Used:
Miter Saw
Brad Nailer
Orbital Sander

Project Total: $30-35

Here were our construction steps:


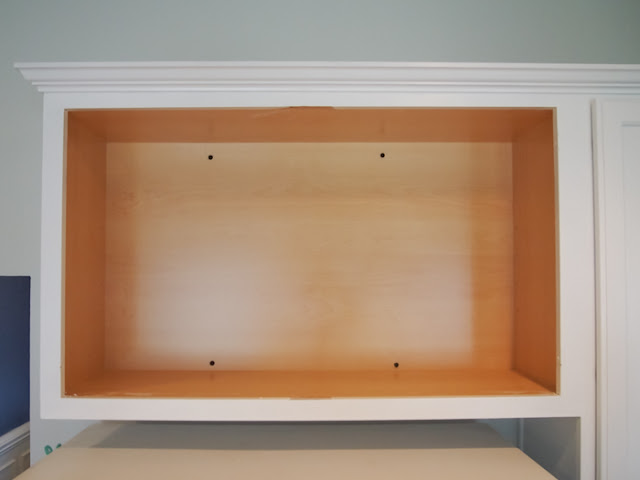
  1. Remove cabinet doors, shelf, and cross piece. 
  2. Clean cabinet interior
    DIY Wine Cabinet - Above the Fridge | Whispering Whims
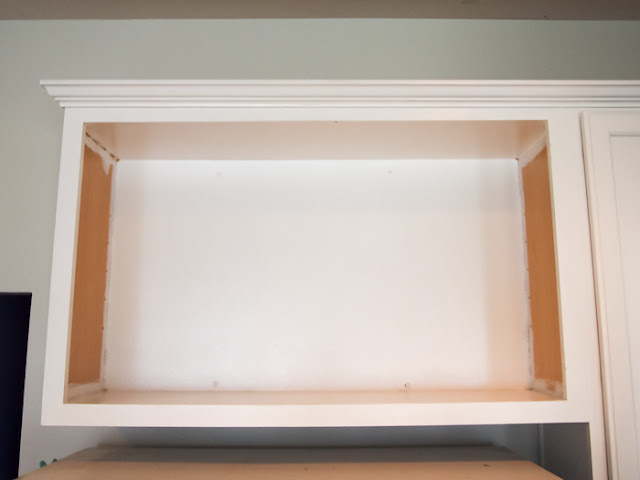
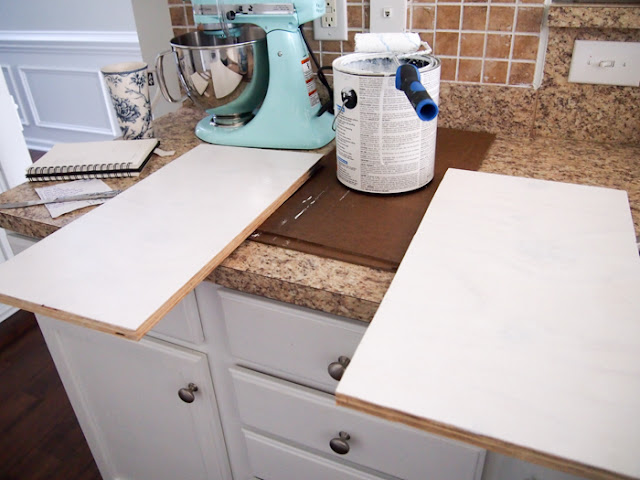
  3. Prime cabinet (2 coats) 
  4. Paint cabinet (2 coats)  Let this dry completely before assembling the wine shelves.  If the paint has not thoroughly cured, it will peel.
    DIY Wine Cabinet - Above the Fridge | Whispering Whims
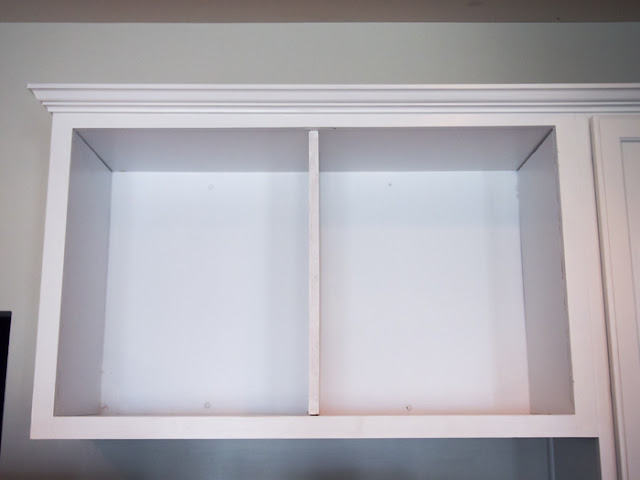
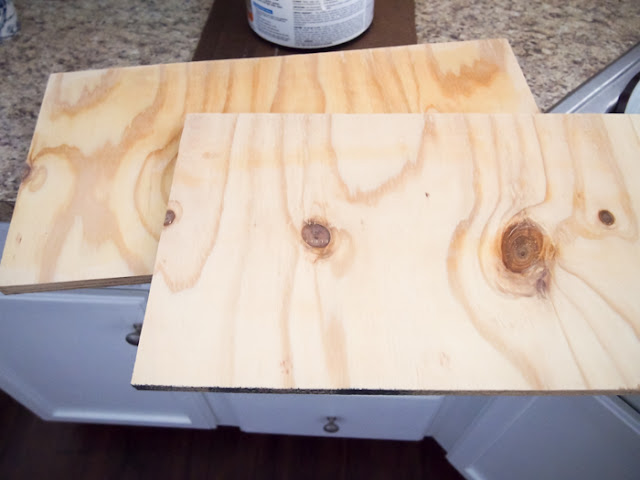
  5. Cut the three vertical shelves from the plywood.  We put one vertical piece of wood in the center to divide the cabinet space and make two X shelves for wine.  We used two additional vertical pieces of wood to make the sides of the cabinet flush with the cabinet edges (note: in the image above, the two unprimed sides).  This allows the X shelves to slide into place, flush with the edges.
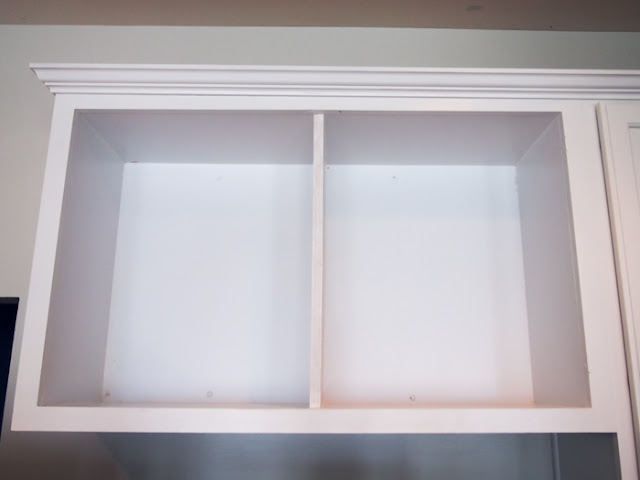
  6. Sand, prime, and paint, then secure in place with Brad Nailer and Liquid Nail.  We used only glue for the side pieces.  For the center piece we used liquid nail along the top and bottom and also nailed it into place.
    DIY Wine Cabinet - Above the Fridge | Whispering WhimsDIY Wine Cabinet - Above the Fridge | Whispering Whims
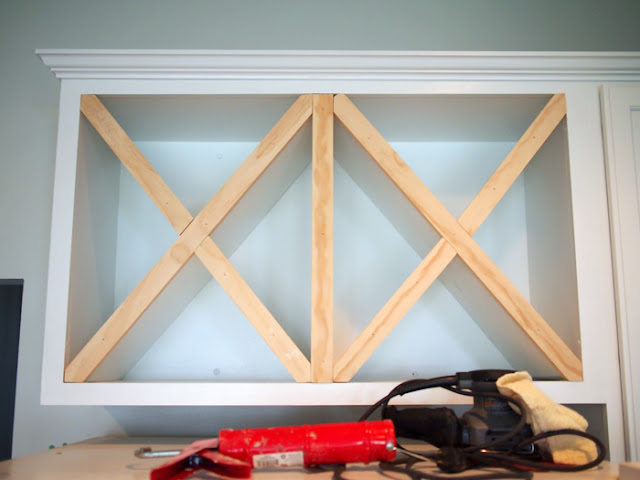
  7. Once the vertical shelf is in place, measure the length of the cross pieces you will need.  We measured and cut our wood to length first.
    DIY Wine Cabinet - Above the Fridge | Whispering Whims
  8. Next we determined the angle of the end cuts by holding our cross boards up to the edge of the cabinets and marking the boards where they touched (the geometric math only works so well). 
  9. After the end angles were cut, we inserted one piece at a time and then marked the middle of the board where the middle notch needed to be cut.  This part is what the experts call "custom cabinetry," which is really a bit of trial and error to make sure you cut and chisel out the space for a perfect fit.
    DIY Wine Cabinet - Above the Fridge | Whispering Whims
  10. When all cuts were made we slid all pieces into place to make sure they fit well.
  11. Prime and paint the cross shelves.
    DIY Wine Cabinet - Above the Fridge | Whispering Whims
  12. Insert into the cabinet and caulk all seams.
  13. Measure and cut the 1"x2" boards to finish the edges. 
  14. Attach edges with Brad Nailer
    DIY Wine Cabinet - Above the Fridge | Whispering Whims
  15. Fill holes with caulk.
  16. Paint one last coat to cover the caulk seams and edges.
    DIY Wine Cabinet - Above the Fridge | Whispering Whims
I'm so happy to have this project finished and also to have a new place that's out of the way to store some wine! It's great to gain a bit more counter space.  Time for some entertaining! ;)

Monday, October 19, 2015

Single Serve S'mores

I think we've all seen the BuzzFeed S'mores Dip video recipe.  I tried it this past weekend at my cousin's house... it was delicious!  Despite setting the marshmallows on fire in the oven and "toasting" them... it was still delicious.  

In addition to realizing that they only need 30 seconds on broil instead of 3 minutes (whoops!),  I realized that making the S'mores Dip is A LOT of dessert.  Unless you have a bunch of people that are going to have your back and eat what you can't handle... it's probably a more feasible {and healthier} option to make your own single serve portion. 

Since I'm essentially living the bachelorette lifestyle this semester, I embarked on a mission this evening to make some dessert for one!  It turned out to be just as delicious as normal s'mores... but minus your hair smelling like smoke afterward.  :)  Win, win.  

Single Serve S'mores | Whispering Whims

Single Serve S'mores Dip:


  • 1 Ceramic Ramekin
  • 3 Marshmallows cut in half
  • Chocolate chips (enough to cover the bottom completely)
  • Graham Crackers for dipping
Pour chocolate chips into ramekin.  Place marshmallows on top.  Bake at 400°F for 10 minutes, or until the tops of marshmallows are browned.  Use broil (with caution) if you want to speed up the browning - only about 30 seconds is necessary.

Enjoy! :)

Monday, October 5, 2015

Mindful {Monday} | Well Hello Again...

I've been skimping on the mindful Monday posts.. and well my posts in general.  It's not that I haven't been mindful, but instead that I have been really trying to live so much in the moment recently {honestly, I've been forced to} that I don't always have a moment {or always want to spend a rare moment} writing here.

Our new schedule has been a bit of a challenge and getting used to it {am I used to it?} has taken a bit of time.  I really have the easy job in this whole Paul going back to school thing.  It's keeping us both busy, but like always, I am amazed at the speed of time.  That speed is both a relief, as we can see the end in sight, and a bit scary with exam deadlines, papers, and non-stop homework always looming.

I do love how organized it has forced us to be. There is nothing like rising to meet a challenge and I feel like that is what we have both been doing; me on the home-front and him in the classroom.

Here is the schedule we have settled into lately:

Monday & Tuesday: 
5:20 AM - Wake up, walk the dogs, shower and get ready.
7:00 AM - Rose to work
7:15 AM - Paul to work
12:30 PM - Paul to Library
5:30 PM - Paul to class
5:30 PM/6:00 PM - Rose to home
6:30 PM - Eat, feed pets, walk dogs, shower
8:30 PM - Paul, class ends
9:00 PM - Paul home
9:30 PM - 10:30 PM - Bed please.

Wednesday
5:20 AM - Wake up, walk the dogs, shower and get ready.
7:00 AM - Rose to work
7:15 AM - Paul to work
12:30 PM - Paul to Library
5:30 PM/6:00 PM - Rose to home
6:30 PM - Paul to class
6:30 PM - Rose eat, feed pets, walk dogs, shower, cook
9:15 PM - Paul, class ends
10:00 PM - Paul home
10:00 PM - 10:30 PM - Bed please.

Thursday
5:20 AM - Wake up, walk the dogs, shower and get ready.
7:00 AM - Rose to work
7:15 AM - Paul to work
12:30 PM - Paul to Library
5:30 PM - Paul to class
5:30 PM/6:00 PM - Rose to home
6:30 PM - Eat, feed pets, walk dogs, shower
8:30 PM - Paul, class ends
9:00 PM - Paul home
9:30 PM - 10:30 PM - Bed please.

Friday
5:20 AM - Wake up, walk the dogs, shower and get ready.
7:15 AM - Rose to work
7:15 AM - Paul to work
5:00 PM - Rose to home
5:30 PM - Paul to home
Some time after work: Grocery Shopping/Dinner

Saturday
7:00 AM - 8:00 AM  - Wake up, walk the dogs, shower and get ready.
12:00 PM - Paul to library, Rose cleans home & HOPEFULLY works on projects!!
5:30PM / 6:00PM - Dinner
Hopefully time to hang out after this... just depends on homework

Sunday
7:00 AM - 8:00 AM  - Wake up, walk the dogs, shower and get ready.
12:00 PM - Paul to library, Rose cooks dinners and packs lunch for the week & HOPEFULLY works on projects!!
5:30PM / 6:00PM - Dinner
Hopefully time to hang out after this... just depends on homework

So you can quickly see where our time now goes each week. Also, Pippa {our dog} has been getting into a strange habit of jumping up onto the bed in the middle of the night and waking us up.. sometimes multiple times.  On these nights we wake up so sleep deprived... we wonder how people that have kids do this???

Anyway, our schedule isn't anything special, but it has forced us to really get into a better habit of being more efficient with our time and schedule things as much as possible.  Planning meals and cooking large batches has been essential to making sure we are eating well... Which means we stay away from the fast food.  I mean... maybe a pizza here or there on a Friday ;) 

We are both definitely looking forward to a break during Thanksgiving and Christmas {which you know I'd love to pack with projects}... but, honestly, I'm really looking forward to just hanging out and binge watching movies with my hubby, whom I miss quite a bit. 


Thursday, October 1, 2015

DIY Pottery Barn Inspired Ladder

With the temperatures starting to cool off and this whisper of Autumn in the air, 
I've been on an endless pursuit to cozy up our home.
Pottery Barn Inspired | DIY Blanket Ladder $25 | Whispering Whims

Time to bring out the blankets, candles, and harvest decor.  

So, in between the 3 unfinished projects I've been whittling away, 
{dining room gray conundrum, cabinet wine rack, and a file cabinet makeover}
I decided it would also be a good time to start a new project. :)
Specifically, I needed a place to display/store my cozy blankets.

I needed a place safe from our pets, where they couldn't climb all over my blankets
 and leave behind their fur, unlike the arm of a sofa or over-sized basket.

Recently, I purchased a couple knit throws from Pottery Barn
and remembered seeing them draped over a rustic looking ladder in the photos. 
It looked interesting, cozy, and I knew exactly where I would place it.

Of course, when I went to go see how much the ladder cost, I was a bit shocked.
There is no way I was going to pay $250 for a ladder that I could surely make for 10 times less. 

I stalked the Potter Barn ladder for dimensions, estimated the wood and dowel sizes, 
then I marched to the store to go buy said supplies. 

The dimensions I originally figured were as follows:
5' tall by 19" wide
5 rungs spaced about 11" with about 8" gap on either end

NOTE: I measured out 5ft on the wall and since our ceilings are pretty high, it just looked a bit underwhelming.  I decided it needed to be a bit bigger.  Pottery Barn sells an 8ft ladder, but 8ft looked a bit too big.  Instead, I went with 6ft and adjusted my dimensions to the following:

6' tall x 20" wide
6 rungs spaced 11" with 8.5" gap on either end

Materials Purchased:
$15 (3) 1 1/8" x 48"  Solid Wood Dowels
$4 (2) 2" x 3" x 96" Kiln-Dried Whitewood Stud 

Tools Used:
Drill using 1 1/8 Woodboring Spade Drill Bit
Compound Miter Saw 
{any saw can be used if you have a steady hand and a good sander}
Electric Sander

Other Materials:
Elmers Wood Glue
Elmers Wood Filler
Straps or Clamps
Stain


  1. Cut the 2"x 3" down to 6' length
  2. Cut the dowels to 20" length

    Pottery Barn Inspired | DIY Blanket Ladder $25 | Whispering Whims
  3. Measure 8.5" up from the bottom of the 2"x 3" side pieces and mark where your rungs will be placed, every 11 inches. 
  4. Drill rung wholes 1/2" deep.

    Pottery Barn Inspired | DIY Blanket Ladder $25 | Whispering Whims
  5. Wood fill and sand any imperfections or knots
  6. Glue in rungs, measure width of ladder to make sure it is even from bottom to top
  7. Clamp or strap the bottom and top

    Pottery Barn Inspired | DIY Blanket Ladder $25 | Whispering Whims
  8. Lay flat to dry overnight
  9. Do any last wood filing, sanding, and dusting
  10. Prime wood for staining with a wood conditioner
    Pottery Barn Inspired | DIY Blanket Ladder $25 | Whispering Whims
  11. Stain wood with desired color. Allow to dry overnight. {I used a brown glaze left over that was never used when we did our cabinet redo.}
    Pottery Barn Inspired | DIY Blanket Ladder $25 | Whispering Whims
  12. Coat wood with wax or clear polyurethane
Pottery Barn Inspired | DIY Blanket Ladder $25 | Whispering Whims

Pottery Barn Inspired | DIY Blanket Ladder $25 | Whispering Whims

Pottery Barn Inspired | DIY Blanket Ladder $25 | Whispering Whims


My next goal for the living room is to get this IKEA chair and chaise to flank the fireplace.


Also, there is an imminent ottoman makeover... the whim is more than whispering.
My poor ottoman needs a slip cover or reupholster, badly!


All images and text are property of Rose Spadaro and may not be reproduced without permission. This site is powered by Blogger and was made a little lovelier by The Sunday Studio.